Optical Print Centering
(SVG version; updated 12/18/2022)
“Beauty is mathematics, mathematics beauty,”—that is all
Ye know on earth, and all ye need to know.
Pierre Renault in rec.photo.darkroom posted a very interesting method of optically centering a print on a mount. The original source seems to be Black & White Photography by Rand and Litschel. Here is my equation that determines the print position mathematically, and a script that graphically illustrates the results.
|
From: Russell Subject: Re: Automatic optical centering - WAS: Square Format Framing - 1 attachments Newsgroups: rec.photo.darkroom Date: 2000-12-20 23:57:23 PST Wm = Width of mount Hm = Height of mount Wp = width of print Hp = height of print Distance between top of print and top of mount = (Wm + Wp) (Hm - Hp) / 4Wm --Russell "Pierre Renault" wrote in message news:9010E33FAcheungmomailandnewsc@205.237.233.50 ... > > Here's how to automatically optically center any print on any board. > > Place the print to be mounted in the upper left-hand corner of the > board. If you are placing a print under a matte board, then place a > piece of paper the same size as the desired cut-out. > > Bisect the vertical strip to the right of the print and draw a light > line with a pencil from top to bottom. Do the same thing for the strip > below the print. Draw a line from where the horizontal line crosses the > vertical line you've drawn to the right edge of the board. > > Next, place a straightedge from the point on the right-hand edge of the > board where the horizontal line ends to the bottom left-hand corner of > the print. Mark the spot where the line intersects the line bisects the > vertical strip. > > Place the lower right-hand corner of the print at this intersection. > > This works first time, every time. > > Pierre (Archived in Google Groups.) |
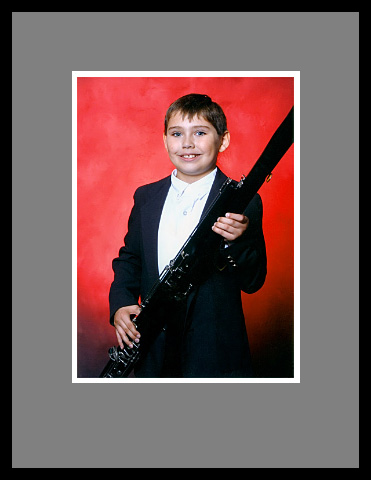
The optically-centered print is slightly above center. This may be more visually pleasing, because of an illusion in which a vertically-centered print seems to “sink” a little on the mount. From Rand and Litschel:
An optical illusion occurs if a print is absolutely centered on a board. This illusion makes the top border of the board appear larger than the bottom and gives too much visual weight to the top. Optical centering is a technique to overcome this illusion. It allows for more space at the bottom of the board, in a direct relation to the size of the print, and establishes a firm visual foundation for viewing the print.
From Lambrecht and Woodhouse, Way Beyond Monochrome 2e: Advanced Techniques for Traditional Black & White Photography:
It is commonly agreed, and obvious even to the most untrained observer, that a print centered on the vertical axis appears to be too low on the mount. This print placement creates an unfortunate optical illusion that the print is not equally spaced at top and bottom . . . . In other words, the print seems to sag below the vertical center.
One accepted technique involves placing the print near the ‘optical center’ of the mount . . . .
See also:
Matting prints centered at the Large Format Photography forum;
Tips for framing by Keith Cooper at Northlight Images.
Reasons for the illusion may include the fact that the human eye tends to scan from top to bottom, and finds a comfortable resting place just above center:
19 Factors That Impact Compositional Balance by Steven Bradley at Vanseo Design;
Designing Using a Visual Center by Steph Schinkel at The Paper Mill Store.
Another principle is that of vertical foreshortening; the eye expects vertical lines to recede upward, and to appear shorter the farther up they go. Thus,
In general, vertical lengths tend to be overestimated in comparison with horizontal lengths, and vertical lengths in the upper part of the visual field tend to be overestimated in comparison with vertical lengths in the lower part. B.G. Stacey, “Explanations of the horizontal-vertical illusion and the foreshortening of receding horizontals.” Life Sciences, Volume 8, Issue 22, Part 2, 1969, pp 1237-1246. ScienceDirect.com
Placing a print slightly above center thus preserves the illusion that the upper part of the visual field appears shorter, like a tapered Greek column.
See also The Photographer’s Eye: Composition and Design for Better Digital Photos by Michael Freeman:
There is a natural tendency to apply our experience of gravity to images and image frames. As we’ll see in Chapter 3, verticals express a gravitational pull downwards, while horizontal bases provide a supporting flatness.
and Mathematics and art at Wikipedia.
The script
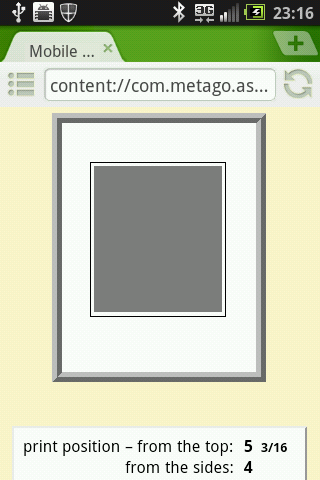
The following script calculates the print position using any of several formulas, and illustrates it graphically.
First, enter mount and print dimensions, and press Enter (or click draw). Select lock print size for a work that cannot be resized. Select a mode (optically centered, mat ratio, or equal top and sides). Then you may:
• left-click and drag on the display to move the print vertically;
• right-click and drag to resize the print;
• hold down the Ctrl key and do the same to resize the mount;
or
• click the arrowheads beside mat ratio, or enter a value and press Enter, to move the print vertically;
or
• press Alt + Arrow Up or Down to move the print vertically, or Alt + Arrow Left or Right to resize it.
When resizing, the print’s vertical position is determined by the selected mode (optically centered, mat ratio, or equal top and sides); when moving the print vertically, the mode switches to mat ratio.
The units are arbitrary. Fractions are optional; note the fractions vs. decimals selectors near the bottom of each panel.
Include the space between the mat and print edges if appropriate. Extra space at the bottom is optional.
Rabbet width refers to the inner edge of the frame that overlaps the edge of the mount. In the illustration, the frame stock is 2x the width of the rabbet.
Lock print aspect ratio allows you to easily adjust the size of the print by changing either of the dimensions; it also applies when resizing the print with the mouse.
When resizing the frame, the preview width is preserved; click the arrowheads beside scale the display to adjust it if necessary.
△ ▽
mount:
print: scale the display: △ ▽ | ||||||||||||||||||||||||||||||||
) ) save as text | ||||||||||||||||||||||||||||||||
The following guides appear when resizing or moving the print or mount:
The area at the top or bottom turns red when the top or bottom mat width is less than that of the sides.
Excess space at the top appears in red when the print is below center.
The mat ratio, or the ratio of the top visible mat width to the sum of the top and bottom visible mat widths (0.5 when the print is vertically centered), is an alternative to optical centering. An optimal value is maybe 0.44 (at which the bottom mat to top mat ratio is the square root of the golden ratio, or the ratio of the sides of the Kepler triangle, fwiw).
How big should the mount be? It is ultimately a matter of taste. I myself dislike mounts that seem overly large; there is something pretentious about them. But a good image deserves a little “personal space.” One option is to use the golden ratio (Φ ≈ 1.62), which dates back to Pythagoras and is considered an aesthetic ideal. If the ratio of the mount dimensions to the print dimensions is the golden ratio, then the ratio of the mount area to the print area is the golden ratio squared, or Φ2 ≈ 2.62. The area ratio is displayed above when calculating the print and mat dimensions. I have used the entire visible mount area, minus any excess space at the bottom of the mat ( = the white area in the illustration at right), as this seems to determine the overall impression.
Note that scale influences the effect of the mount size. The golden ratio works best for prints viewed from a distance significantly larger than the image diagonal. I once had a print on my office wall that was scaled to exactly Φ2 on a 32 × 40 inch mount; the mat widths were almost 7 inches. From close up, they looked way too big; 5 ½ inches looks like it would have been plenty, consistent with an area ratio of about 2. But from a distance, the impression changed and the wide mat started to look more appropriate. The reverse is true for tiny prints on hand-sized mounts.
In case you are curious, here are the dimensions of two framed Ansel Adams photographs:
8.9 × 11.6 on 16 × 20, area ratio 2.80, mat ratio 0.48
19.25 × 15.25 on 30 × 24, area ratio 2.18, mat ratio 0.48
You may press R to rotate the display, G to show the guides, or O, M, or E to select optically centered, mat ratio, or equal top and sides.
The dimensions in the upper panel are based on the visible area inside the frame. The print position and mat widths in the lower panel are relative to the mount itself.
The inches to cm option is for those who prefer to use inches for the overall material dimensions (the upper panel), while at the same time measuring the mat widths and print position in centimeters (the lower panel). 16ths+ is my way of reading 32nds (half a 16th above the indicated value).
Sometimes optical centering results in the top mat width being narrower than that of the sides; equal top and sides sometimes results in the top mat width being narrower than that of the bottom. In cases like these, you will probably want to use one of the other centering options, or make further adjustments. In the words of Lambrecht and Woodhouse:
This technique is only a good starting point, and not an automatic substitute for accomplished design or personal preferences. If placing the print at the optical center results in an unattractive, narrow border on top or bottom of the print, additional vertical adjustments have to be made.
Download
Photoshop script
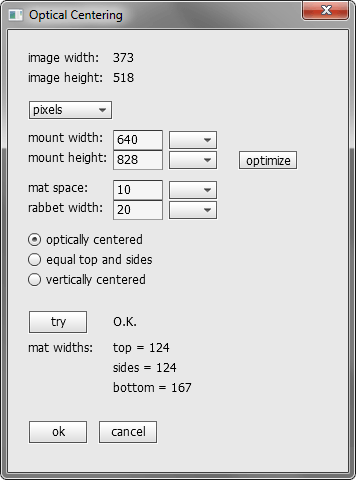
Some members of the Photoshop community have tried the optical centering concept, by expanding the canvas then centering the original image on a virtual mount. Here is a photoshop script, Optical_Centering.jsx, that should do the job. It should be fairly self-explanatory. After entering a mount width, “optimize” calculates a height for which the optically-centered mat has equal top and sides. If you enter a mat space, the mat is colored gray so you can see the space. You can recolor or uncolor it as needed. If you enter a rabbet width, the hidden edge of the mount is colored black. Press “try” to display the dimensions before running the script.
Tested in CS2 and CS5. You may need to flatten the image first. Settings are saved to an .ini file in your default user folder. Updated 2/1/2011.
Just to point out, if you are wanting to print an image optically centered on a mount-sized piece of paper, you might try calculating the print position, then using it as the top margin in the print dialog.
© 2022 by Russell Cottrell. Updated 11/17/2022.